How to follow activity from your browser and desktop based work applications in Produce8.
The Produce8 Browser Extension enables you to easily follow activity from any URL of your choice. It is compatible with Google Chrome, Microsoft Edge, and Brave browsers. Additionally, the Produce8 Desktop Extension allows you to connect to activity from various Desktop Apps that you use, such as Zoom, Slack, or Teams.
Completing a Tech Audit:
Before inviting new users to your Produce8 account, conducting a thorough tech audit is essential to ensure proper setup. We recommend that an Admin takes the following steps to configure the account and add data sources before inviting new users:
- Audit of Work Tools: Conduct a comprehensive survey of the tools utilized by team members, both desktop-based and browser-based.
- Gather Information: Collect details about each tool, including its name, type (desktop or browser-based), and URL (for browser-based tools).
- Add Data Sources: Once the audit is complete, add the identified tools as data sources in Produce8. This ensures seamless connectivity and accurate activity tracking across all relevant apps and websites.
- Define Categories: You can create custom App Categories to group apps for the same purpose or workflow. Ensure that the Apps you have added have been mapped out to the correct Categories. For more information on App Categories, click here.
Benefits of Adding Data Sources Before Inviting Users:
Adding data sources from the tech audit before onboarding new users offers several advantages:
-
Prevents the creation of duplicate apps.
-
Streamlines the onboarding process for new users.
By following these steps and adding data sources from the tech audit to Produce8 before onboarding new users, you can ensure that the account is fully configured and ready for use by the team.
Adding Data Sources: Add the Data Sources from Your Tech Audit to Produce8
Depending on your permission settings, you may be able to add new Apps. Be sure to look for an existing App before creating a new one to prevent duplicates.
There are two ways that you can add Apps to your account:
- Catalog Apps: Pre-configured based on the most popular work Apps.
- Custom Apps: Any App or website that you wish to connect to.
You can create Catalog Apps & Custom Apps in three different places:
- How to add Apps from the Produce8 Web App
- How to add Apps to your web based tech stack
- How to add Apps from your desktop based tech stack
Catalog Apps in the Produce8 Web App
Produce8 has a catalog of the most popular work Apps that our customers use readily available to connect to. Here's how you do so:
1. Log into your Produce8 account
2. In the top right corner, select your name. In the dropdown, select Apps.
3. Select Add an App
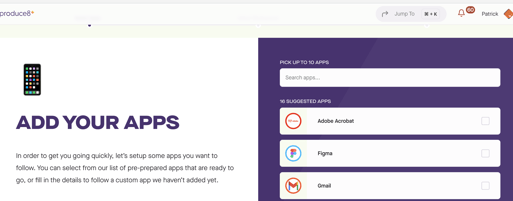
4. You will then see the below screen where you can select the Apps from the Catalog.
5. Next, select which Workspaces to add the App to. For more information on Workspaces please see here.
6. Success! The Apps you selected will now be analyzed in the workspaces you have chosen. Check back in 30 minutes to make sure the data is there.
Be sure to add in and authorize any relevant Direct Integrations to ensure you have access to comprehensive insights into your work habits.
Resources:
Custom Apps in the Produce8 Web App
If you do not see an App that you would like to connect to within the Produce8 App Catalog, you can create a Custom App. Here's how to do so:
1. Follow steps 1-3 from the above flow
2. Scroll to the bottom of the list of Apps and select Create a Custom App
3. The next screen will prompt you to connect to the app via either the Browser Extension or Desktop Extension.
For tools that you only use via their URL (for example, you only use www.salesforce.com) on your Browser, you only need to select 'Add web addresses to analyse'. For tools that you only use on the Desktop (eg Slack or Zoom desktop App), you only need to select Find it in our Desktop Extension. If you use a tool on Desktop (Slack app) & Browser (www.slack.com) you must select both.
To follow via the browser extension:
1. Select 'Add web address to analyze'
2. Add the Web Address Name and Browser URL (Salesforce, www.salesforce.com). Select Next.
3. Select the Workspace(s) you wish to display activity from the App you have created.
4. Click Add to Workspace.
5. Success! Your activity will now be tracking in the selected Workspace(s)
To follow via the Desktop Extension
1. Select 'Find it in our Desktop Extension'
2. You will be prompted to open the Produce8 Desktop Extension
3. Once you have done so, open the Desktop App you want to follow
4. Click back onto the Produce8 Desktop Extension. The App you wish to follow will be shown. Click Next.
How to add Apps from the Browser Extension
You can connect to web URLs you would like to follow using the Browser Extension. To do so, follow these steps:
Catalog Apps in the Browser Extension- Ensure you are logged into the Produce8 Browser Extension by selecting the Produce8 logo in the bookmark bar of your browser
- Go to the web URL you wish to follow
- Click the Produce8 logo in the bookmark bar
- You will see the following message for the corresponding App that you wish to set up. Select Add the ['APP NAME'] app.
- Select the Workspaces you would like activity from this App to show in
- Done! Your activity from this App will now show in the selected Workspaces.
Custom Apps in the Browser Extension
- Follow steps 1-3 as above
- In the Produce8 browser extension select Follow This Page
- On the next page, select Create A New App
- You will then see the App Name, logo and color pre-populated. If you wish to change these, you can do so. If not, select next.
- Now, you need to specify the type of traffic you want to follow. You have several options:
- All traffic from a Domain: For instance, you can choose to follow all traffic from a domain like "https://itglue.com."
- An exact page: If you want to track activity on a specific page, provide the exact URL (e.g., "https://itglue.com/subdomain").
- Activity from a prefix or suffix: This option includes "Custom Matching." You can specify a prefix or suffix to track, for example, "https://P8WildCard.itglue.com/P8Wildcard." To learn more about Custom Matching, please click here.
Warning: Be cautious not to subscribe to domains that could result in overlapping events. Avoid subscribing to both "docs.google.com" and "docs.google.com/document," for example.
6. Select the Workspaces that you wish activity from this App to be available in.
7. Done! Your activity from this App will now show in the selected Workspaces.
How to Add apps from the Desktop Extension
You can connect to the Apps that you use from your Desktop via the Produce8 Desktop Extension. Follow the below steps to do so:
Catalog Apps in the Desktop Extension
- Ensure that you are logged into the Produce8 Desktop Extension by opening the Extension seen below next to the battery symbol.
- Once in the extension,click the Plus sign in the top right corner.
- Select the App(s) that you would like to follow and then click Subscribe to [number of] App(s).
- Select the Workspace(s) you would like the activity from the App(s) to be available in
- Done! Your activity from this App(s) will now show in the selected Workspaces.
If you use the App that you have added on the Browser as well, you have the option to add the web URL on the final stage of creating the App.
Custom Apps in the Desktop Extension
Follow steps 1-2 as with the Catalog Apps- Scroll to the bottom of the Suggested Apps.
- Select Choose an App from your device.
- Open the App that you would like to connect to. You will see the below screen in the extension, select Next.
- You will see a list of your open Apps. Select the App(s) that you wish to connect to. Click Next.
- Select Link To App.
- Click Create a New App.
- Name the App, select it's Logo and assign it a color. Click Next.
- You will now be sent back to the screen where you selected Link to App. Click Next.
- Select the Workspace(s) you would like to see the Apps activity in.
- Done! Your activity from this App(s) will now show in the selected Workspaces.